API design and development are critical components of modern software development. Postman, a widely used API development and testing tool, offers a user-friendly interface that simplifies the process. This comprehensive guide will provide detailed step-by-step instructions on designing and developing an API using Postman.
We will walk you through each stage, from API specification to testing and documentation, while incorporating a real-world weather API example to illustrate the process.
Table of contents
- Understanding API design principles
- Getting started with Postman
- Defining the API specifications
- Creating requests and responses
- Setting up request authorization
- Testing the API
- Documenting your API
- Conclusion
Understanding API design principles
Before diving into Postman, it is crucial to grasp the fundamentals of API design. Consider the following principles to ensure an excellent developer experience:
- Clarity: Ensure your API is intuitive and easy to understand.
- Simplicity: Keep your API simple and avoid unnecessary complexity.
- Consistency: Maintain consistent naming conventions, error handling, and response formats.
- Scalability: Design your API to accommodate future growth and changing requirements.
Getting started with Postman
- Download and install the latest version of Postman from the official website. Refer to our Postman installation guide if you need help.
- Launch Postman and either create a new workspace or open an existing one. Workspaces act as containers for organizing your APIs and related resources.

- Familiarize yourself with the Postman interface, including the navigation pane, request builder, and response viewer. Otherwise, you can go through our past articles on Debugging APIs with Postman and Writing & Running API Tests in Postman.
Defining the API specifications
- Create a new collection in Postman to represent your API. Collections allow you to organize related requests.

- Give your collection a descriptive name that reflects the purpose of your API.

- Add individual requests corresponding to different API endpoints within the collection. For example, if you are building a social media API, you might have requests for creating a post, retrieving a user’s feed, and updating a user’s profile.
Creating requests and responses
Within the request creation process, you will define the HTTP method, endpoint URL, request headers, query parameters, and the expected response.
Let us use a weather API as an example to illustrate this step:
- Create a request named Get Weather within your collection.

- Set the HTTP method to GET and the endpoint URL to https://api.example.com/weather.

- Configure the necessary headers, such as Content-Type: application/json.

- Add query parameters such as city and country to specify the location.

- Define the expected response, such as a successful response with a status code of 200 OK and a response body structure containing temperature and description fields.

Setting up request authorization
To secure your API endpoints, you must set up request authorization in Postman. Here is how to do it:
- Determine the type of authorization your API requires (e.g., Basic Auth, OAuth 2.0, API key).
- In the request, navigate to the Authorization tab.
- Choose the appropriate authorization type and enter the required credentials or API key.

- Verify that the authorization is set up correctly by sending the request and ensuring successful authentication.

Testing the API
Testing is crucial to API development to ensure its functionality and correctness. Postman provides robust testing capabilities. Here is how to test your API using Postman:
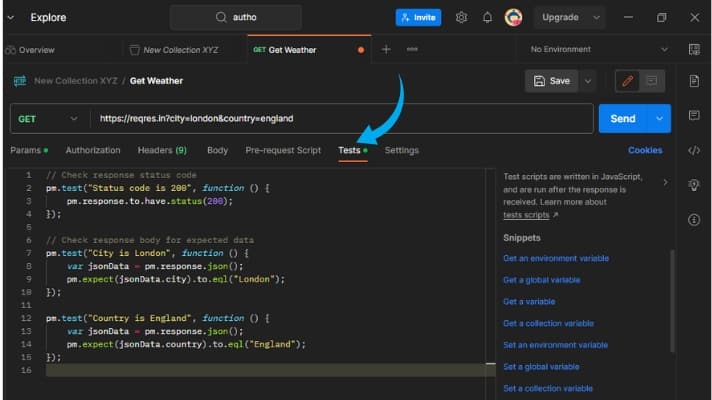
- In the request, navigate to the Tests tab.
- Write JavaScript test scripts to validate the response data, status codes, or expected behaviors.
// Check response status code
pm.test("Status code is 200", function () {
    pm.response.to.have.status(200);
});

// Check response body for expected data
pm.test("City is London", function () {
    var jsonData = pm.response.json();
    pm.expect(jsonData.city).to.eql("London");
});

pm.test("Country is England", function () {
    var jsonData = pm.response.json();
    pm.expect(jsonData.country).to.eql("England");
});
Code language: JavaScript (javascript)
- Run the tests by sending the request and observing the test results in the Postman interface.

- Analyse the test results and make any necessary adjustments to your API implementation.

Documenting your API
- Documenting your API is essential for developers who will integrate with your API.
- Utilize Postman’s documentation feature to generate API documentation automatically.
- Include API endpoints, request and response examples, authentication requirements, and error-handling information.
Final thoughts on API design and development with Postman
Designing and developing APIs with Postman streamlines the process and enhances productivity. Following the step-by-step guide in this article, you can create well-designed APIs using Postman, ensuring clarity, simplicity, consistency, and scalability.
The real-world weather API example showcased how to make requests and responses while handling authorization, query parameters, and headers. Additionally, we covered testing and documentation to ensure the reliability and accessibility of your API. Start leveraging Postman’s powerful features today and build robust APIs that meet the needs of your users.
This post is part of our comprehensive Postman Mini-Course.
Follow our blog
Be the first to know when we publish new content.
- Top 10 API Testing Tools - April 6, 2024
- The ABCs of UAT Testing: Understanding User Acceptance Testing - March 21, 2024
- Agile Testing: Key Principles and Practices - March 15, 2024
