Import SoapUI test cases to Postman
A versatile set of tools is essential in the ever-evolving software development and testing world. SoapUI and Postman are two of the most popular tools used for API testing, and combining their strengths can significantly improve your testing capabilities. In this article, we’ll guide you through integrating SoapUI with Postman, allowing you to harness the power of both tools seamlessly.
Before we dive into the integration process, please ensure you have both SoapUI and Postman installed on your system. If you still need to, refer to the respective SoapUI installation guide or Postman installation guide.
Table of contents
- Launching SoapUI
- Create a new project
- Add test cases
- Configure and run test steps
- Export test case to Postman
- Import Postman collection
- Running Postman tests
- Difference between SoapUI and Postman
- Conclusion
Launching SoapUI
Open SoapUI. If you’re unfamiliar with the SoapUI interface, exploring its features and functionalities is a good idea before proceeding. Familiarizing yourself with the interface will help you seamlessly navigate the integration process. Otherwise, refer to our guide on creating and organizing test cases in SoapUI.
Create a new project
- In SoapUI, click File in the top-left corner. Select New SOAP Project.

- Give your project a meaningful name, and you can provide a WSDL URL or import an existing WSDL file in the Initial WSDL/WADL dialog. This step will depend on the specific API you want to test. Follow the prompts to configure your project accordingly.

Add test cases
- In your project, right-click on the TestSuites node and select New TestSuite.

- Give your test suite a name and optional description.
- Right-click on the new TestSuite and select New TestCase.

- Provide a name for your test case.
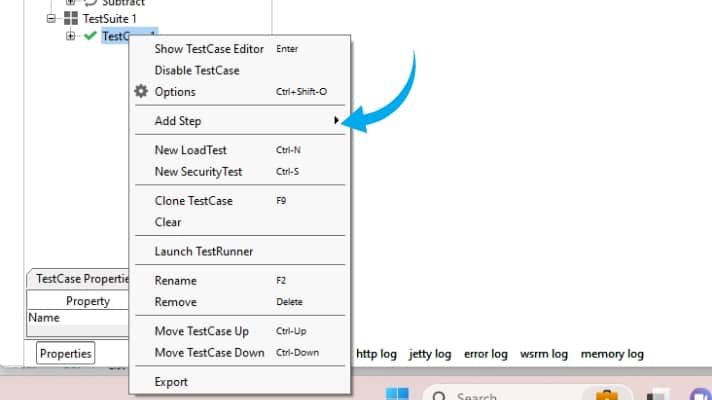
- Right-click on your test case’s Test Steps node and select Add Step.
Configure and run test steps
- Choose the appropriate test step type based on your testing needs. SoapUI offers a variety of test step types, including HTTP Requests, REST Requests, JDBC Requests, and more.

- Configure the test step settings, such as the request URL, method, headers, and request body. Make sure to tailor these settings to your API.
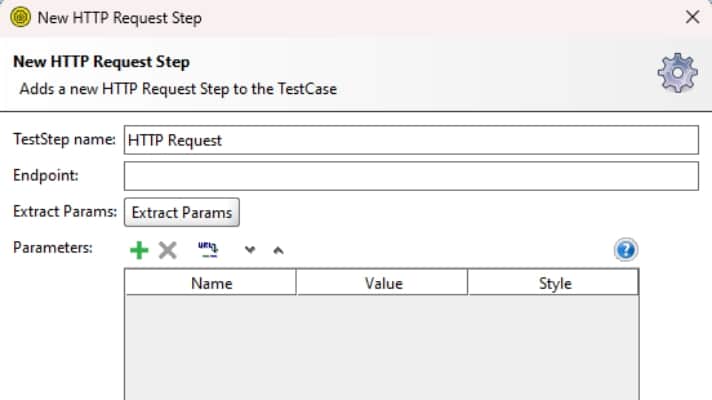
- Repeat the process to add more test steps for your test case.
- To run your SoapUI tests, right-click on your test case and select Launch TestRunner. SoapUI will execute the test steps and display the results.

Export test case to Postman
- Once you’ve created and tested your API tests in SoapUI, you can export them to Postman for further testing and collaboration.
- To export a test case, right-click on the test case in the Navigator.
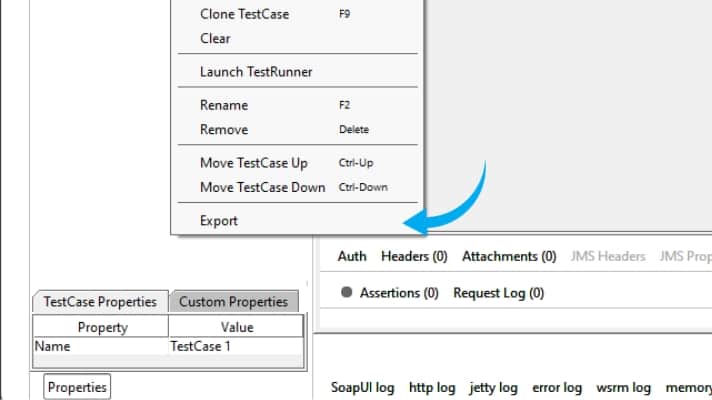
- Select Export, then choose Postman Collection v2.1 as the export format.

- Save the exported collection to your preferred location.
Import Postman collection
- Open Postman and click on Import in the top-left corner.
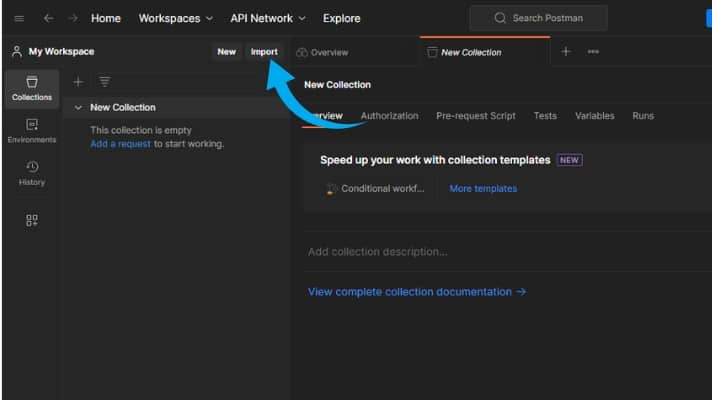
- Choose the Choose Files option and select the Postman collection file you exported from SoapUI.
Running Postman tests
- In Postman, you can now execute the imported collection to verify the functionality of your API.
- Click on the collection in the left sidebar to open it.
- Click the Runner button to execute the entire collection or select specific requests to run.

- Review the test results and assertions within Postman.
Difference between SoapUI and Postman
SoapUI and Postman are potent tools for API testing, but they have distinct features and use cases. Understanding the differences between these two tools can help you choose the most suitable one for your specific testing needs:
Testing approach
- SoapUI: Primarily tests SOAP (Simple Object Access Protocol) and RESTful APIs. It is well-suited for testing SOAP-based web services and offers robust support for XML-based requests and responses.
- Postman: Is versatile and supports SOAP and REST APIs, making it suitable for a broader range of APIs. Postman is particularly favored for REST API testing and is known for its user-friendly interface.
User interface
- SoapUI: Has a comprehensive but relatively complex interface, which can be intimidating for beginners. It provides extensive features for creating detailed test cases.
- Postman: Offers a user-friendly and intuitive interface, making it more accessible for users at all levels of expertise. It is known for its simplicity and ease of use.
Test creation
- SoapUI: Excels at creating complex and detailed test cases. It allows you to define intricate test scenarios with many assertions.
- Postman: Is known for its simplicity in creating and managing test cases. It offers a visual environment for designing tests, making it quick and easy to set up test scenarios.
Collaboration
- SoapUI: Provides collaboration features, they may not be as user-friendly or robust as those in Postman.
- Postman: Offers extensive collaboration features, including team workspaces, version control, and the ability to share collections and environments quickly.
Scripting and automation
- SoapUI: Supports scripting in languages like Groovy, allowing for advanced test automation and customization.
- Postman: Supports JavaScript scripting but may not be as powerful as SoapUI’s scripting capabilities.
Final thoughts on integrating SoapUI with Postman
By integrating SoapUI with Postman, you can leverage the strengths of both tools in your API testing efforts. SoapUI excels at creating complex test cases, while Postman offers a user-friendly interface and collaboration features. This integration allows you to design your API tests in SoapUI and seamlessly transfer them to Postman for execution and sharing with your team. With these powerful testing tools at your disposal, you can ensure the reliability and functionality of your APIs with ease. Happy testing!
Related articles
- Serenity Cucumber testing
- SoapUI introduction
- Automating API Testing with SoapUI
- Postman-Jira integration
- Postman Pro features
- Jenkins-Docker integration
Follow our blog
Be the first to know when we publish new content.
SoapUI Postman integration tutorial
- Top 10 API Testing Tools - April 6, 2024
- The ABCs of UAT Testing: Understanding User Acceptance Testing - March 21, 2024
- Agile Testing: Key Principles and Practices - March 15, 2024
